
 |
|
Looking After Your Chain † Basic and essential maintenance of your motorcycleís drive chain can not only extend the life of the chain and sprockets but help avert getting into what might end up being insurmountable difficulties. Adjusting your Chain Chain adjustment is one of a few basic maintenance undertakings that every rider should be able to do; and itís easy Ė if you know what youíre doing.
Sorry if that sounds a bit simplistic. But Iím assuming, hopefully not too judgmentally, that there might be readers as careless as I - as I discovered recently i.e., discovered that Iím careless; not that the readers are. Touring through Glenn Innes in the north coast hinterland of NSW not so long ago, having returned there after riding the old Glenn Innes to Grafton road (mainly gravel), a passer-by drew my attention to a very drooping chain that I had not noticed. I was to discover that photos would later reveal it had been excessively drooping for several days and several hundred kilometres! Fixing it was beyond my capacity in both terms of knowhow and tools. To cut a long story short, I was to spend three days in Glenn Innes waiting for a much-needed new chain and sprocket set to arrive and be installed. So now I have added a new-found skill and the essential tools to my carry-with-me gear. Hopefully, this brief advice might help others (and myself) avoid the problems of an errant chain parabola. Step 1 Ė to be undertaken regularly Eyeball the parabola; and, if it looks different to how you thought it looked on the previous occasion, measure the distance between the slack position of the chain (bottom of the droop) and the position of the chain when you turn the droop upside down. Do this midway between front and back sprockets.
The manual for my BMW F700GS says the gap (chain deflection) should be 30-40 mm (motorcycle with no weight applied, supported on its side stand). But check your manual. Or, with any luck, your bike will have a sticker with the chain deflection on it. Measuring the deflection wonít be a problem if youíre home, but it might be if youíre on the road. Having a few measurements marked on the spanner youíll need (see steps 3 and 4 below) might help. To add another complication, being sensitive to a very dear friend, if the bike has a factory lowered suspension, the range becomes 20-30 mm (for the F700GS). Step 2 Loosen the axle nut a couple of turns. Youíll obviously need the right size spanner in your kit and caboodle bag. For the F700GS, itís a size 24 mm. Yours might be different. Youíll need to check it physically because the manual probably wonít tell you. Step 3
Step 4 Turn the adjusting nuts on each side bit by bit to get the chain to the correct parabola or droop. On the F700GS, youíll use the same 13mm spanner as for the lock nuts (despite the seeming size variation in the photos). At this stage, check the position of the chain (with the measurements marked on the handle of your spanner!). The scale checks should be used to see that the readings are the same on each side. Step 5 Tighten the lock nuts on each side. The F700GS manual says they should be tightened to 19 N-m but I donít imagine everyone will have a torque wrench with them! I donít even own one. Step 6 Tighten the axle nut (in the case of the F700GS, to 100N-m!). This might well be the most crucial step so donít get lazy simply because itís the last one. Checking Chain Wear A chain thatís worn beyond its use-by date Ė like showing stretch marks Ė can wreak havoc on the sprockets; not to mention other possible outcomes, like coming off (the chain, that is). This I learned in Glenn Innes to my frustration and cost (in terms of both time off the road and money for goods and services). There are a couple of ways to check for chain wear:
With the bike in first gear Ė the engine is NOT running (just to be clear) Ė turn the rear wheel in the direction of travel until the chain is tensioned. The instruction is then ďmeasure the length of the chain over 9 rivets below the rear wheel swing arm.Ē Obviously keeping the chain tensioned. The manual says that the maximum chain length in these circumstances is, wait for it, 144.30 mm. How on Earth does a normal person measure 0.30 mm? The manual cautions that, if the chain has stretched to the maximum permissible length, get professional advice! Iím guessing that this rule of thumb would have some wider application but your manual or chain packaging might clarify that.
Again, with the bike on its standĖ and engine NOT running or likely to start Ė apply tension to the chain (probably good enough to use the side stand this time). In one diagram I saw this was done by squeezing the top and bottom rungs of the chain together; hence my descriptor ďthe dirty way.Ē My bike doesnít lend itself to doing that, so I had to settle on pushing the bottom rung of the chain up tight to get the tension. Use latex gloves! The idea is then to try and pull back the chain from the rear sprocket. The chain should be tight on the sprocket. If thereís give in it, thatís a sign of stretching. Itís probably an indication that you need to seek professional advice. Frankly, Iíll stick to the clean way. Tools to Carry
So now I have tucked away with my puncture repair kit: a 24 mm spanner for the rear axle; a 13 mm spanner for the lock nuts and adjustment nuts; and a few measurement markers indelibly written on one of the spanners to gauge 30-40 mm. I suppose I should have a measurement instrument that at least covers 144.30 mm, but I donít. |
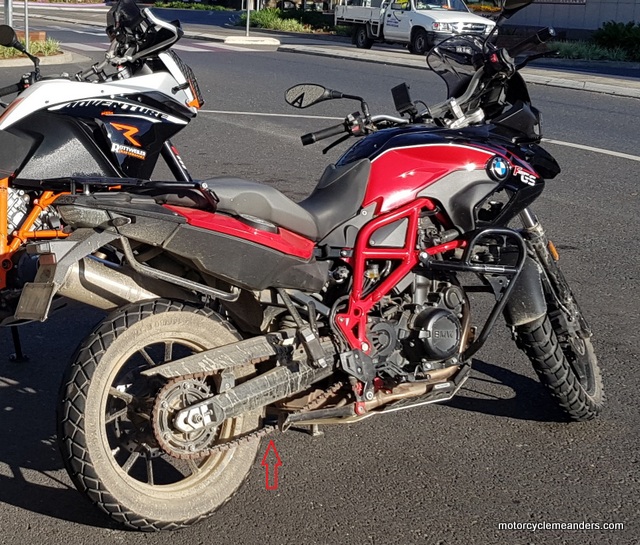 The first requirement is to keep an eye on the stretch of the chainís parabola: basically, how much itís drooping. Thereíll be specific metrics relating to this in your ownerís manual or on-line or on a sticker on the bike. If the droop is outside the recommended parameters, your chain needs adjusting.
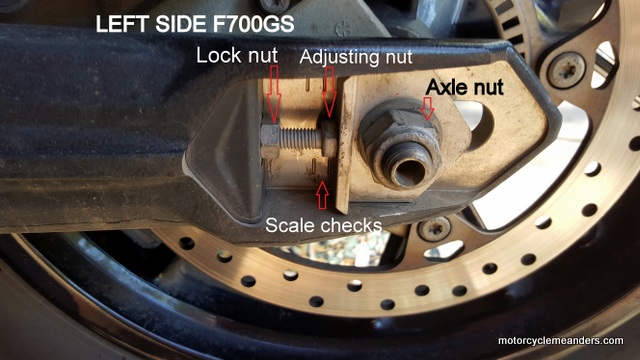 You might be well advised to make this measurement regularly rather than rely too much on eyeballing.
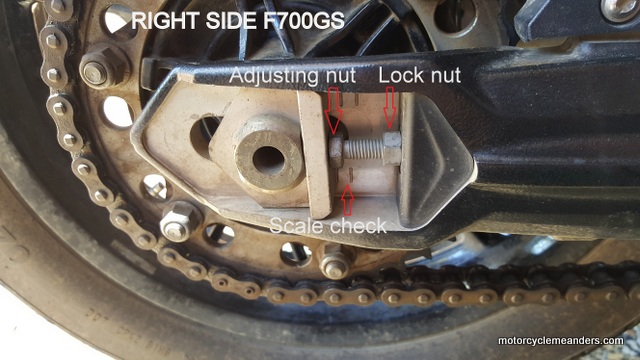 Loosen the lock nuts on each side of the bike. For the F700GS, thatíll require a size 13 mm spanner. But, again, yours might be different; and the manual may not help.
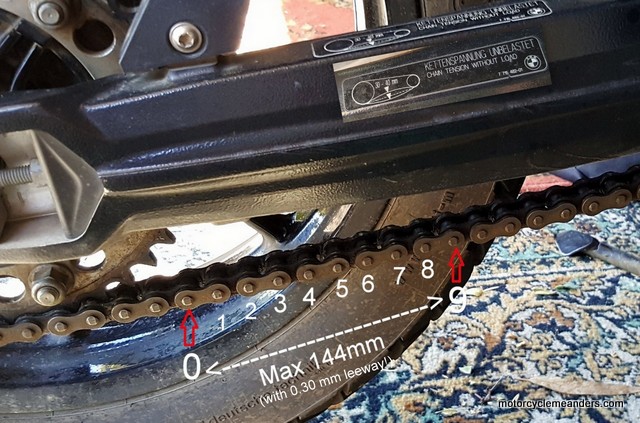 According to the F700GS manual, youíll need a level and firm surface with the bike on its centre stand. This wonít be easy for my friend with the factory-lowered suspension as hers doesnít have a centre stand; but she has a very cooperative husband who holds the back of the bike up for her so she can oil the chain. That would work.
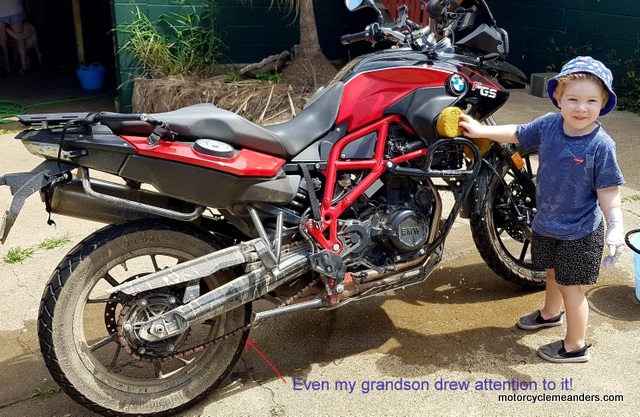 If Iíd picked up on the drooping chain early enough, I might have rescued both chain and sprockets. But even if I had the knowhow, I would have been left high and dry without a few basic tools in my pocket or saddle bag.