|
|
Repairing Punctures This page is in two sections. The first deals with my experience with repairing a puncture on the go in a tubeless tyre on my BMW F700GS (it was the rear tyre). The second is some hopefully helpful information I put together some time back when I owned a BMW F800GS Repairing a Puncture in a Tubeless Tyre
I've only had to do it once before; and had so many helpers I hardly saw what was happening let alone remembered anything. So recently in a remote forested area I was confronted with the challenge. Fortunately, I was in the company of far more experienced riders so I didn't do much more than watch again. But some lessons were learnt. 1. Getting the offending screw out of the tyre required some pliers. None in the repair kit! And seemingly none in kits on offer on the Internet! Fortunately, one of the group had some in a tool kit. Without pliers, we would not have got any further so deeply embedded was the screw. 2. Opening up the hole with the reamer tool wasn't a too much of a problem despite the straight handle (see more on this below), although it was still an effort to get through the tyre. 3. The hook tool had a plus and a minus to it. The plus was the small gap at the tip of the tool that makes it easy to extract after inserting the plug. The minus was the straight handle that made it difficult to insert the plug. Many kits on offer have a T-shape handle on both the reamer and hook tools. Much better!
5. Two of us had repair kits. But in both, the little tubes of rubber glue had dried up. Once opened (or the tube has frayed) they have a short shelf life. Take care! 6. Fortunately, someone had a small compressor to run off the battery. That beat my option of a hand pump. Or the other option of CO2 canisters (see more on this option below). The upshot was insertion of a non-glued plug - difficult to insert without he lubrication of the glue (and with a straight-handled hook tool); and without glue on the plug, it leaked. But the job got me to a town servo in stages of 20km at a time before needing to repump.
Heres my check list for a repair kit (more or less in order of using them):
Co2 Cartridge Inflator Test This is worth a read. The results differ a little from what's said in the video above, but the bottom line seems to be that you'll likely go through a few of the 16g canisters (seemingly the common size in repair kits) to get the tyre to a reasonable pressure. Just don't have a second puncture before you reach home or a servo. "Every once in awhile I see someone ask a question about the effectiveness of Co2 cartridges for motorcycle tire inflators. It seems that repair kits with Co2 inflators are becoming more popular. I think thats good from the standpoint that people have more options to deal with a flat in an emergency. The cartridges come in three popular sizes in terms of volume of air: 12g, 16g and 25g, where g refers to grams. Now the question is whats needed to fill a motorcycle tire? I decided to waste 4 of our 16g cartridges and on the rear tire of the Versys 1000 (tubeless, 180/55-17, 42 psi). When the air discharges from the cartridge it becomes super cold. Some have said it gets cold enough to burn skin. Im not putting that to the test. The way it works is once locked on the valve stem, the inflator barrel is slid backward along a track and held there to discharge the air. Theres a big woosh and the rest streams out over 8-10 seconds. The first cartridge was quite a bit short of filling the tire. The second cartridge showed a one-pound improvement over the first. The third and fourth cartridges were consistent with the first two. Note that the cartridges get all frosty. So, the average psi per 16g cartridge was 5.5 psi and all four pumped the tire up to 22 psi. This is actually better than I expected. Applying a little math to the information obtained, filling the tire to its 42 psi spec would require 8-16g cartridges, 10-12g cartridges or 5-25g cartridges Your conclusions about whether Co2 cartridges are a good idea or not would be interesting to hear. There are certainly pros and cons. However, as part of an emergency kit with no less than 4 cartridges, I think it may be all one needs to get to the filling station after a flat repair and get a tire filled properly. However, I think Ill continue to carry my Air Compressor."
Is a plugged tyre okay to ride for the rest of the tyres life? Although there are lots of opinions about plugging in general, one things for sure: plugging a tyre from the outside, as described above, might well be the only option for a fix by the roadside but its certainly not a permanent solution. Its designed and intended as an emergency stop-gap measure only. Ride judiciously only as far as you have to in order to get a permanent solution. The permanent solution is most likely to be a new tyre but its possible that an internal plug put in by a professional tyre repairer might suffice in some circumstances. Given how much life and limb depend on a tyre on a motorcycle, the safer option will always be a new tyre. It should also be noted that tyre manufacturers emphasise that the temporary plugs described above are suitable only for the main treaded part of the tyre; not for the side walls or even close to the edge of the treaded part. You might like to look at this article on plugging a motorcycle tyre. It covers pros and cons of plugging tyres and sets out some of the pitfalls.
This includes removing and replacing wheels. Never having repaired a puncture on any on my motorbikes (at the time this was written), Im not really in a position to tell anyone what they should do or how they should go about it. Ahead of setting out on a trip on my F800GS, I thought I should learn how to repair a puncture; and not tempt fate, as I probably did on my Old Mail Routes trip, where there were some lonely, phoneless spots, including where I came to grief. I also might have been a bit adventurous in taking my F800ST up the Oodnadatta Track during My Big Trip North, where I might not have even got mobile phone reception let alone easy access to Roadside Assistance! But, at least the F800ST had tubeless tyres and I had those magical plugs and a small hand pump, even though at that time I most likely lacked the ability to use them effectively. So, now, with the tubed tyres of the F800GS, I figured its imperative to know how to AND be able to fix a puncture. This page is mostly focussed on the more challenging part of repairing punctures, namely, removing the wheels and replacing them; and removing the tube. Hopefully, the actual repairing of the puncture will be spelt out in the repair kit youll need to have. The Tools Youll Need What motivated me to write something on tools you'll need was the discovery of two things:
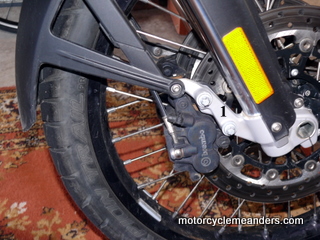
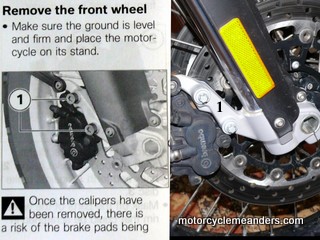
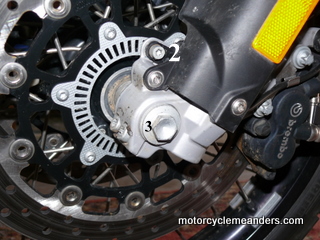
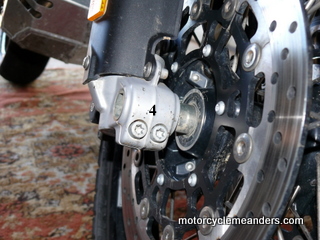
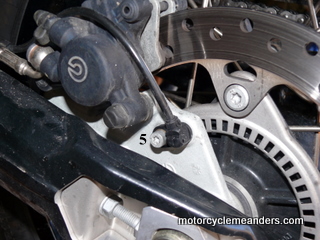
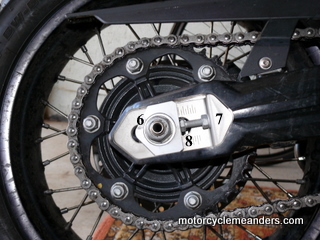
As far as I can ascertain, youll need the following tools: Front Wheel To remove the brake calliper (# 1 in photo), youll need an E12 Torx Socket. To remove the ABS sensor (# 2 in photo), youll need a T30 Torx Driver. (But take note of description in video clip about removal - or not - of ABS sensor.) To slacken the axle clamping screws on both sides (# 4 in photo), youll need a T45 Torx Driver. (The tool kit includes a 40 Torx Driver but I'm not sure why.) To remove the axle screw (#3 in photo), youll need a 17mm spanner. (Not a 22mm as indicated in some places.) Rear Wheel To remove the speed sensor (# 5 in photo), youll need a T30 Torx Driver. To remove the axle nut (# 6 in photo), youll need a 24mm spanner. To slacken lock nuts (# 7 in photo) and back off adjusting screws (# 8 in photo), youll need a 13mm open-ended spanner preferably two of them. (But, as with ABS sensors, take note of how this issue is handled in video clip below.).
In the sparse tool kit under the seat at least as my F800GS arrived there is a T40 Torx Driver and a 17mm spanner. That leaves you short of the following: E12 Torx Socket, T30 Torx Driver, T45 Torx Driver, 2x13mm open-ended spanners and a 24mm spanner. It's not clear to me if all these are even included in the optional extra "service toolkit". With these additional acquisitions, you should have everything you need....except, of course, an easy way of jacking up the front wheel, an easy way of breaking the bead (i.e. getting the tyre loose from the wheel rim), repair stuff to fix the puncture, and an easy way of pumping up the repaired tyre. Other Handy Equipment There are solutions to all these steps. I have them all covered...I think. Except for the further key element of knowhow. Setting knowhow or ability aside, the next things you could usefully have are set out below. However, there are always alternative options. Im sure that several have proved effective, like rocks or stumps to jack up the front wheel (or the beer slab on the back as mentioned in the video below); the side stand of a mates bike to break the bead; or a hand bicycle pump to get some air into the repaired tyre. Short of these, the following would help: Either out of paranoia or attraction to new toys, I was seduced at the Sydney Motorcycle Show into buying a Tyrepliers repair kit consisting of two tyre levers (supposedly cunningly designed so that one end releases the tyre and the other (without pinching the tube) secures it; a bead breaker; and a package of fixes for, at your choice, a tubeless tyre or a tube (or, as an optional extra, both). Then, persuaded by a dirt riding colleague, I succumbed to purchasing a ForkStand designed for the F800GS by BestRest Products. This little apparatus, easily storable within the bikes frame, keeps the front wheel off the ground to allow its removal. Finally, another BestRest Products item, their Bike Pump, is 12v powered and comes with any number of options for connecting it to the bikes battery without being thwarted by the BMW Canbus amps limitation. Life is not meant to be easy! To assemble and disassemble the ForkStand, the instructions list the tools needed. In addition to toolks above, the list includes an 8mm spanner. You need that or a small shifter aka adjustable spanner. The latter will more than suffice for the function required. Finally the list has multi-purpose pliers. I think thats basically to cut the ties that you have used to strap some bits of the apparatus to the bikes frame. You wont get the bead breaker to work without a 17mm spanner to turn the bolt that forces the bead. An adjustable spanner would suffice. But, again, the good news is that you already have a 17mm spanner under the seat. Removing and Replacing the Wheels Unfortunately, removing the wheels is part of the process. And replacing them. Hence, identifying all the tools needed in the removal process. In the early days of my 2010 Mt Isa Trip, I had new tyres put on the F800GS in expectation of some gravel road riding into the trip. What was particularly helpful was the tuition provided by Dave of Tyres for Bikes in Brisbane. The following videos illustrate the main steps in the wheel removal and replacement processes. Dave doesnt follow all the steps in the Owners Manual so they are presented here as illustrative only. Sound advice would be to follow the manual and get your work confirmed by a BMW dealer. (Note that this is a disclaimer!) Front Wheel This clip shows Dave, who could easily have won an audition for the job of presenting the demonstrations, removing and replacing the front wheel. (In case you've been here before, this clip is an edited and much shortened amalgam of the two original ones that used to be here.) Rear Wheel This clip shows Dave removing and replacing the rear wheel. As with the video above, it's a shotened amalgam of a couple of original video clips. x A Few Reminders Some memorable gems from Dave of Tyres for Bikes the wheel-changer in the clips above:
Pressures Daves advice for the F800GS was: Front: 32psi. Rear 38psi. (This almost accords with manual for one-up unloaded.) For the dirt, his advice was: Front 20psi. Rear: 26psi. Since writing the above on pressures, Ive learnt a lot more about this issue. The main thing Ive learnt is that there are as many views about pressures for off-bitumen/dual purpose/adventure riding as there are numbers on the pressure scales. Theres also a school of thought partially or even substantially supported during the BMW off-road training course that tyre pressure (i.e. the lowering of the pressure for off-bitumen riding) is not as crucial as many attest. A lot of informed opinion suggests a few psi below the recommended road pressure is a pretty good option for the whole trip of mixed bitumen and off-bitumen riding. More serious off-road adventures especially on sand, bulldust, thick lose stuff mud etc might require some further pressure refinement. |
 Are you well prepared to fix that annoying puncture in your tubeless tyre without having to call roadside assist or the local tow truck?
 4. You need to cut the excess plug once inserted. No cutting instrument! Again, someone to the rescue with a penknife. Some kits on offer include a cutting instrument.
 The basic lesson for me was to make sure I have all the necessary bits and pieces so I dont get caught short, especially if it was only me on the road somewhere remote.